
Archive for 2011
The anoying balance, from metal and stone
I been trying to get the textures at a nice balance, trying not to make them look like stone walls, and not to also over do them, its been a long stuggle but I feel i'm getting more and more closer. thire are allot of tiney details that I'm struggling with but battling on through them.


This is the a process that I have been going through, to get to my final texture.


I feel that this there if not very close, trying to make thise skratched but not like stone.

all freshly baked skates

allong with the textures, now the fun stuff begins, making things to look more nice, and to what they realy are ment to look like, the plastics more plasticy the tin more tin, the metal more metal, the 80's more 80's and the 50's more 50's.
ready to be baked

This is nearly ready to be baked, you may not see the textures very well, but the style of the texture I am aiming for, is well explained on this toy rocket (just forget about the angery ram underneath) the part I am trying to get at is the rivits, and the faint lines marking out the panles.


and finally this is the final point so far of my 50's roller skate, though not quite yet finished, there's a lot more processes to go through on the textureing, on making the parts more tin like, and it to be a little bit more battered up.
80's coloured

Today I started getting the 80's skate ready and coloured, on this you can see the difference in the colours, they're bright and potent. What I also put in the colours is the dark purple and greys as what I noticed from the Dino Riders, and the plasticly blacks aswell.
block colours turn into simple shapes


surface shader and Opinions...

surface shader with block colours I hope I've done this correctly.


moving on I decided to darken down the teslar, trying, and looking through my 50's colour swatches, I found a perfect colour for the robot body on the back, the nice odd green colour
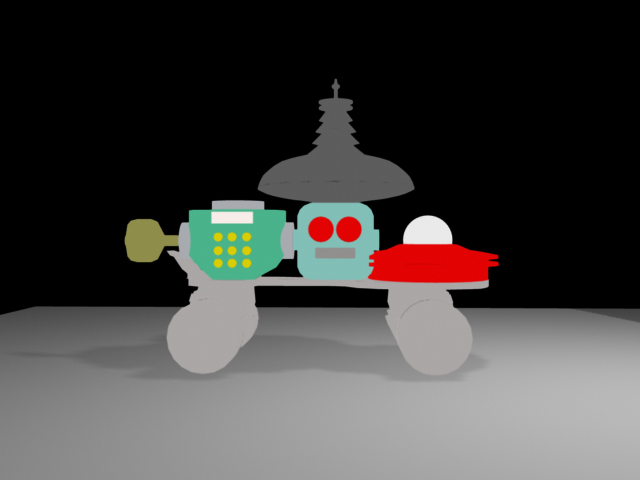
so from here I've spent time trying out different colours, mostly I would like the front to be red as most 50's flying sourcers are red, so I only went through the stage of alterring the colours of the robot head and body and buttons, the one areas I would like to keep consistant is the pail colours based with in the 1950's colour pallette.
I would like to have some opinnions aswell I personally like the combination of number 4, the blue of the robot head is taken from an actual robot from the 1950's. the teslar colour its self is very close fore a base to what I want aswell, like the robots I found with the painted on details.

loft space concept

Here I have mocked up a quick loft space model, to place my skate on. here I thought of, how the skate will turn arround with in the environment and the light source, I also wanted to hint of how the environment in the back ground would look, so it would tell a visual short quick story of the game. What also hit me, was using the recordplayer as the turntable, this could also be the source of music playing in the background or even the noise.
first ever texture test


here I wanted the key to ne more brass looking and the teslar ontop more of a lighter grey, though these are block colours, the 50's model will be mostly made from tin. I feel due to the lighing it has turnned the teslar more white more white.

As for a try out I put the shaders as blins to get to the more tin look to the skate.
@ALAN, A question about colour blocking??
hey Alan should I use the "Baking Ambient Occlusion & Colour Blocking" tutorial to colour the vehicles?
All UV'd and texture mapped

These are the skates finally UV'd and all ready to go.


This is the final 80's map after talking to Alan he said to create it on 4 maps asyou can see there are more parts to the 80's toy, and more complex parts to it, I've tryed to keep the imortant parts on each map, I know what part is and each map go to.
I cant wait to start texturing and getting things ready.
UV'd

both skates fully UV'd, all I need to do now is lay out the UV's and then I'm onto the colouring and texturing and the fun fun stuff
@Alan a question

Hey Alan I'm just questioning whether this plan is sufficiant, I cant fit the two bottom parts at the top, I've tried squeezing all the air out the texture editer, allong with trying to make it understandable when I come to create the textures. I've re-scaled some parts that aren't important smaller, the UV's that are left are the robot head and the robot body, and they are large parts to the model, so I I dont see it wise to shrink them down too heavily. if you could get back to me it would be great if not ill see you tomorow.

The 80's Skate

I feel that I've been working in abit of a garden shed lately through not posting mutch my progress up on my 80's roller skate, something I do apologise for.

Here I'm just referrencing on how I've created the shape through copying a shoe print from an autograph

I worked and minipulated the shoe shape by using a rough box, to create the scale. The box later took the shape of the Gobots head

Finaly I present the finalized 80's skate

This skate has been the toughest skate to build and plan, though I had the autographs to help me, it was still very difficult to plan how particuallt the top part looked, another tricky part was creating the skate trucks


This is the wire frame of the toy. I think there maybe a bit too mutch geometry in places.


This is the finalized version of the truck, it was very difficult shape to build.


